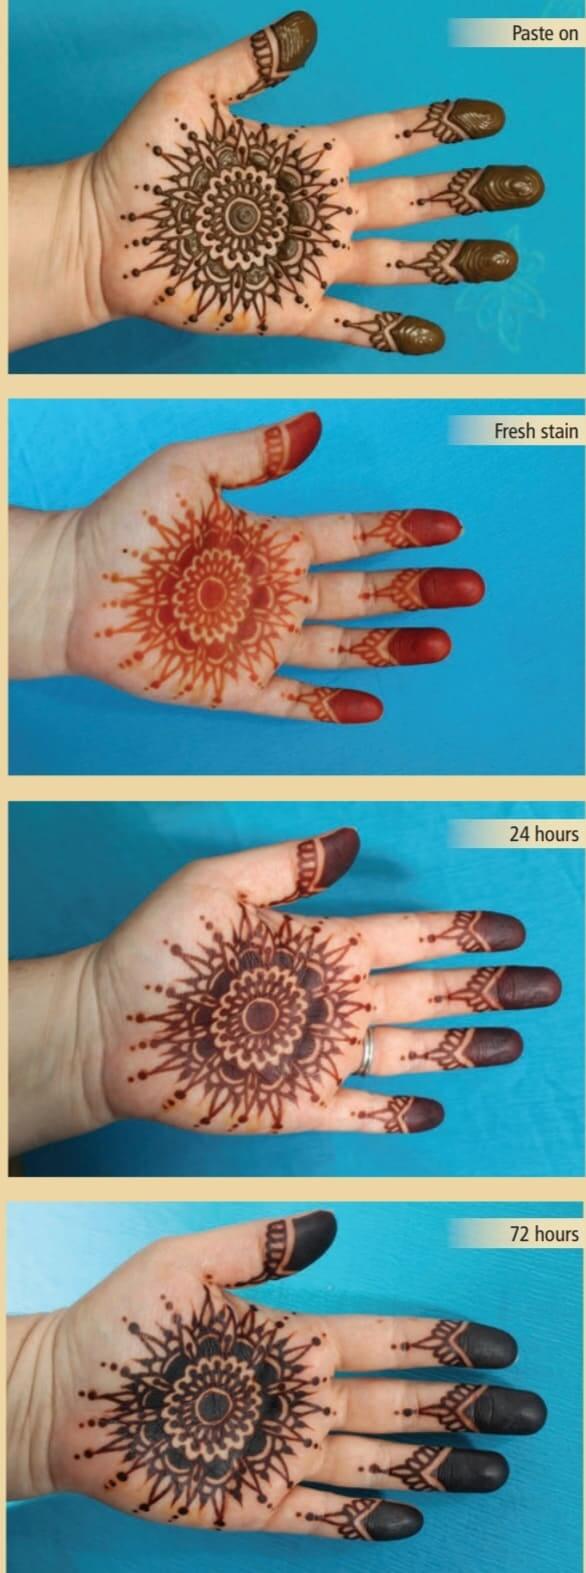
सुंदर और आसान मेहंदी डिजाइन for back hand | Back hand mehndi design | Henna (Mehndi) designs for hands:- Henna powder is made by drying and then grinding the leaves of the henna plant. It is then mixed into a paste, often with lemon juice and cajeput essential oil.
मेंहदी (Henna) के पौधे की पत्तियों को सुखाकर और पीसकर मेंहदी पाउडर बनाया जाता है। इसके बाद इसे एक पेस्ट में मिलाया जाता है, जिसमें अक्सर नींबू का रस और आवश्यक काजीपूत ऑयल तेल डाला जाता है।
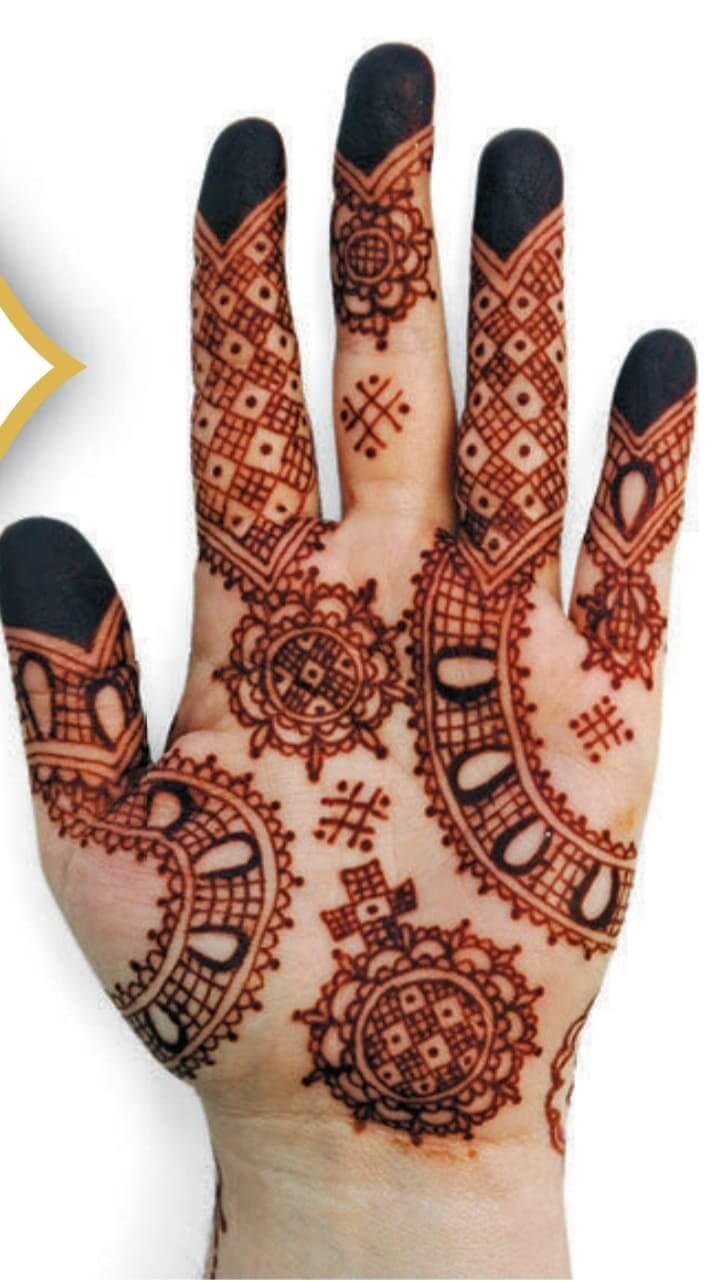
Mauritanian-style henna is richly detailed, with many curving, geometric elements. Henna stains are especially beautiful on the palms, where this deep, rich red is possible
मॉरिटानियन-शैली मेंहदी कई घुमावदार, ज्यामितीय तत्वों के साथ समृद्ध रूप से विस्तृत है। मेंहदी के दाग हथेलियों पर विशेष रूप से सुंदर होते हैं, जहां यह गहरा, समृद्ध लाल रंग संभव है
सुंदर और आसान मेहंदी डिजाइन for back hand

PREPARING HENNA PASTE
Materials
• 100 grams Mohana henna (Mohana is our very favorite henna powder)
• 1.25 cups bottled lemon juice
• 1 ounce (30 ml, 2 tbsp) cajeput essential oil
• Small stainless steel or glass bowl
• Large mixing spoon
• Plastic wrap
• Electric hand mixer
• Pastry bag
• 20 hand-rolled henna
applicator cones

Step 1
Combine ingredients in the bowl and mix with the spoon, making sure
that there are no pockets of dry powder. Press a piece of plastic wrap
down against the surface of the henna paste, and seal it along the
edges of the bowl to ensure that air does not touch the paste while it
develops.
कटोरे में सामग्री मिलाएं और चम्मच से मिलाएं, सुनिश्चित करें
सूखे पाउडर में कही से भी हवा पास ना हो। मेंहदी पेस्ट की सतह के नीचे प्लास्टिक का एक टुकड़ा दबाएं, और इसे साथ में सील करें
कटोरी के किनारों को इस तरह से सील करे कि हवा पेस्ट को स्पर्श न करे जब तक की मेहंदी पेस्ट अच्छे से तैयार ना हो जाये

Step 2
Let the paste sit at room temperature (70 degrees Fahrenheit) for the
length of time the package indicates (typically 24 hours, but timing
can vary by crop year). The following day, use the electric mixer to
smooth out any lumps. Use the highest speed for two to five minutes.
पेस्ट को कमरे के तापमान (70 डिग्री फ़ारेनहाइट) पर रखे, समय की अवधि पैकेज इंगित करता है (आमतौर पर 24 घंटे, लेकिन समय
फसल वर्ष के अनुसार भिन्न हो सकता है)। अगले दिन, इलेक्ट्रिक मिक्सर का उपयोग करें
किसी भी तरह की मेहंदी में गांठ बन जाये उसको चिकना करें। इसके लिए दो से पांच मिनट के लिए उच्चतम गति का प्रयोग करें।
Step 3
Put the paste into a pastry bag. It is helpful to fold the edges of the
bag down about 3 inches so that you have room to close the bag
cleanly.
पेस्ट को पेस्ट्री बैग में डालें। क्युकी ये किनारों को मोड़ने में सहायक होता है
बैग को लगभग 3 इंच नीचे रखें ताकि आपके पास बैग को बंद करने के लिए जगह हो आसानी से।

Step 4
Fill your applicator cones or bottle. This batch size is enough to fill 20
cones, which is enough to decorate multiple tambourines. Put any
excess henna in the freezer, as it is perishable. Henna will last at room
temperature for one to two days, in the refrigerator for about a week,
and in the freezer for a year or more. Thaw by simply leaving the paste
at room temperature
अपने ऐप्लिकेटर कोन या बोतल को भरें। यह बैच 20 कॉन भरने के लिए पर्याप्त है, अतिरिक्त मेंहदी फ्रीजर में रख दो,
क्योंकि यह खराब हो सकती है। मेंहदी कमरे के तापमान पर एक से दो दिनों के लिए रहेगी, और रेफ्रिजरेटर में लगभग एक सप्ताह के लिए,
और फ्रीजर में एक साल या उससे अधिक के लिए रह सकती है। बस पेस्ट को कमरे के तापमान पर छोड़ कर पिघलाएं क्युकी मेहंदी जितनी पिघलेगी उतना अच्छा है
Pakistani arabic mehndi design
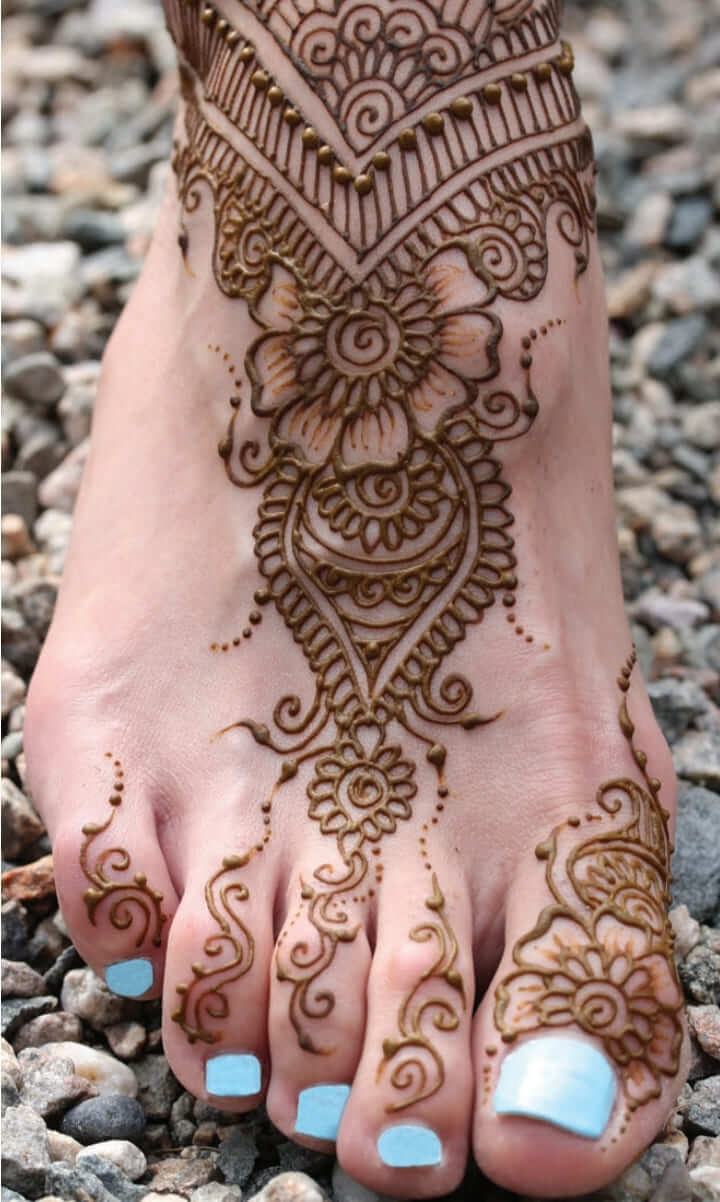
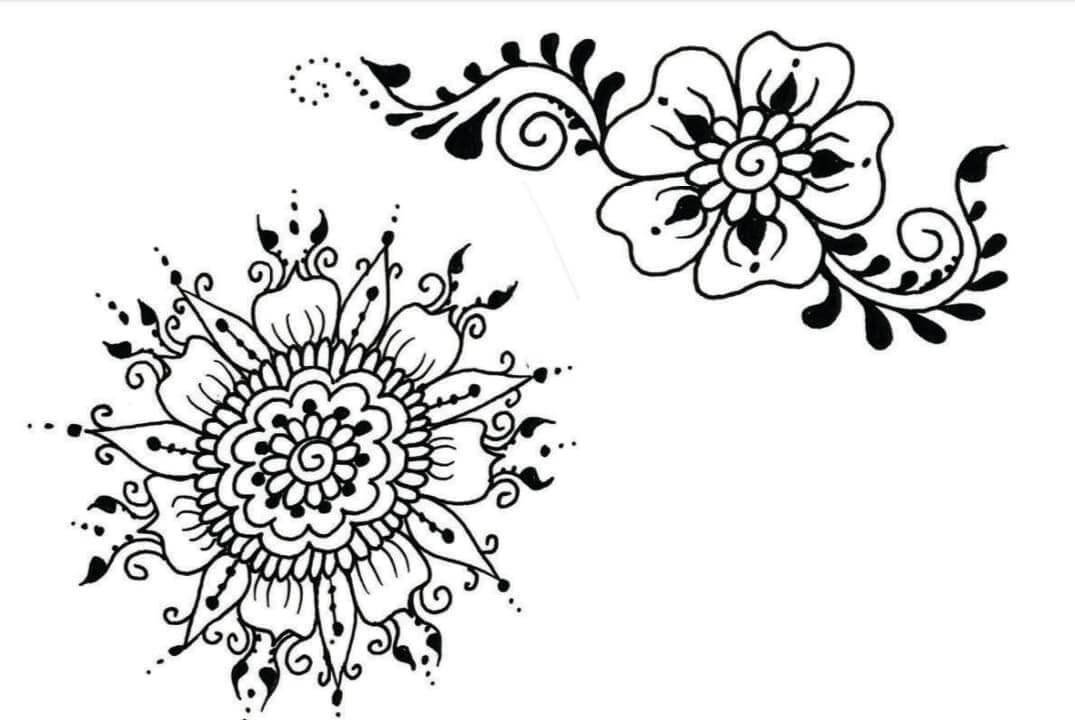
सुंदर मेहंदी डिजाइन for back hand – Back hand mehndi design Practices
Swirly Vine Henna | भंवर डिज़ाइन मेहंदी:-
This motif symbolizes lifelong love and fidelity in wedding henna designs. Vines grow together,
and they become increasingly dependent upon each other for their structure and foundation as
they grow higher. You will often see this light and flowing pattern trailing elegantly down fingers in an
otherwise dense and intricate bridal design. It is essential to make your curves graceful and to draw other
nearby lines to hug or otherwise complement their shape
यह रूपांकन शादी मेंहदी डिजाइनों में आजीवन प्यार और निष्ठा का प्रतीक है। लताएँ एक साथ बढ़ती हैं,
और वे अपनी संरचना और नींव के लिए वे ऊंचे हो जाते हैं और एक दूसरे पर तेजी से निर्भर होते जाते हैं।
आप अक्सर इस हल्के और बहने वाले पैटर्न को एक में उंगलियों के नीचे सुंदर ढंग से पीछे देखते हुए देखेंगे
अन्यथा सघन और जटिल ब्राइडल डिज़ाइन। अपने कर्व्स को ग्रेसफुल बनाना और दूसरे को ड्रॉ करना जरूरी है
आस-पास की रेखाएँ गले लगाने के लिए या अन्यथा उनके आकार को पूरक बनाती हैं
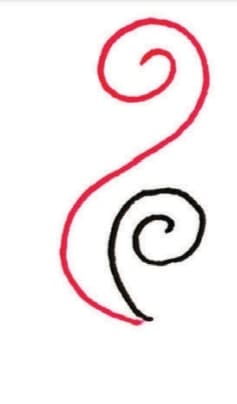
STEP 1
Start with a small, single swirl, then
draw a second swirl facing the
opposite direction that hugs the left
edge of the first and extends higher.
एक छोटे, एकल भंवर से शुरू करें, तब विपरीत दिशा की ओर मुंह करके दूसरा घुमाव बनाएं
जो पहले का किनारा और अधिक फैला हुआ है बाईं ओर को गले लगाती है या उससे जाकर मिलती है।
STEP 2
Elongate your pattern by
continuing to draw arc-hugging
curves ending in swirls, in
opposite directions. Be mindful of
the magnitude of your curves.
आर्क-हगिंग को लगातार बनाते हुवे भंवरों में समाप्त होने वाले वक्र के द्वारा अपने
पैटर्न को विपरीत दिशाओं मे बढ़ाएँ। curves के प्रति सचेत रहें।

STEP 3
Keep going! Make sure the
overall flow is pointing in the
direction you want the swirly
vine to go. When this is trailing
down a finger, as it so often is
in traditional patterns, the vine
tends to direct itself naturally.
करते रहे! सुनिश्चित करें की
समग्र प्रवाह की दिशा स्विरली की ओर इशारा कर रहा है जो आप चाहते हैं
जब यह एक उंगली पीछे चल रहा है नीचे, जैसा कि अक्सर पारंपरिक पैटर्न में होता है
स्वाभाविक रूप से खुद को बेल की तरह निर्देशित करता है।

STEP 4
Embellish the curved lines of
the vine, adding teardrop petals,
which henna artists create by
squeezing the application cone
with varying pressure. When
using a pen or pencil, outline
each shape first; then fill it in.
अश्रु की पंखुड़ियाँ जोड़कर बेल की घुमावदार रेखाओं को सुशोभित करें,
जिसे मेंहदी कलाकार बनाते हैं
अलग-अलग दबाव के साथ आवेदन कोन को निचोड़ना
जब भी एक कलम या पेंसिल का उपयोग करते है प्रत्येक आकार से पहले रूपरेखा बना ले फिर इसे भरें।

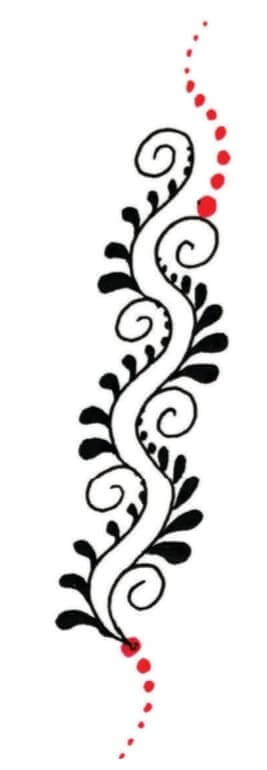
STEP 5
Add trails of dots, in descending sizes,
as a beautiful finishing touch. For
consistency and balance, draw the trails
to follow the curve of the vines.
अवरोही आकार में डॉट्स के निशान जोड़ें,
जैसे एक सुंदर अंतिम स्पर्श के रूप में।
स्थिरता और संतुलन के लिए, ट्रेल्स ड्रा करें और लताओं की वक्र का पालन करने के लिए।
Back hand mehndi design | Henna designs for hands
Swirly Vine Henna | भंवर डिज़ाइन मेहंदी Variations

Back hand mehndi design for wedding
सुंदर मेहंदी डिजाइन | Mehndi Design Tips
यदि आप मेहंदी डिजाइन की तरह शौक रखते हैं या खुद मेहंदी लगाना चाहते हैं, तो यहां कुछ मेहंदी डिजाइन टिप्स हैं जो आपकी सहायता कर सकते हैं
समय के साथ अभ्यास करें: मेहंदी डिजाइन में कुशलता प्राप्त करने के लिए नियमित अभ्यास करें। नए डिजाइन और पैटर्न के साथ खुद को चुनौती दें और नए तकनीकों को अपनाने का प्रयास करें।
सादी मेहंदी: सादी मेहंदी डिजाइन में आकर्षक और सरल गीतिका शिल्प के साथ जाने जाते हैं। पहले से तैयार किए गए डिजाइन खरीदने के बजाय, आप खुद उन्हें बना सकते हैं। यह आपकी मेहंदी को एक अद्वितीय और निजी दोषों से बचाएगा।

नक्काशी की प्रक्रिया: मेहंदी लगाने से पहले, अपने हाथों की सुरखियों को और प्राथमिक डिजाइन को बनाने के लिए उपयुक्त नक्काशी का चयन करें। प्रारंभिक चित्र को पूरी तरह से निर्माण करने के लिए एक आरामदायक और सुविधाजनक स्थान चुनें।
रंगीन मेहंदी: जोड़ी-बराबर रंगीन मेहंदी डिजाइन के लिए, आप रंगीन मेहंदी के लिए पाउडर पैकेट्स और विविध रंगों की बारीक चटाई खरीद सकते हैं। इसे मेहंदी के बाद ही अपनाएं और उसे पूरी तरह से सुखने दें। रंगीन मेहंदी डिजाइन देखने में बहुत आकर्षक और विशेष होता है।
सजावटी आकर्षण: अपनी मेहंदी डिजाइन में चांदी के वर्ण या रट्टी का उपयोग करके और अपनी फ़ैंसी या रिंग्स के साथ अपनी मेहंदी को एक आकर्षक और विशेष लुक दें। आप अपनी मेहंदी को सजावटी और आकर्षक बनाने के लिए अलग-अलग उपकरण भी प्रयोग कर सकते हैं।
संरचना का ध्यान रखें: अपने मेहंदी डिजाइन में संरचना को महत्व दें। आप विभिन्न रंग, आकार और पैटर्न का उपयोग करके एक मेहंदी कंपोजीशन बना सकते हैं। महत्वपूर्ण है कि आपका मेहंदी डिजाइन संतुलित हो और हाथ की बड़ी समय सीमा में स्थान बचाए।
खुदरा और छोटी डिजाइन: यदि आपको सजावटी और सरलता पसंद है, तो छोटे और आकर्षक मेहंदी डिजाइन का चयन करें। आप अपने हाथों के अंगूठे, उंगलियों और कलाई के लिए सुंदर और आसान डिजाइन चुन सकते हैं।

सुंदर मेहंदी डिजाइन for back hand

सुंदर और आसान मेहंदी डिजाइन

सुंदर मेहंदी डिजाइन
- फ्लॉवर वाला हाथ: इसमें आप हाथ की कलाई पर एक छोटा फ्लॉवर डिजाइन बना सकते हैं। इसके लिए आपको सदा मेहंदी की लाइन बनानी होगी, जिसे आप पहले गूठर बनाएंगे और फिर पंख जैसी समतल डिजाइन बनाएंगे। इसके बाद, छोटे फूलों के आकार और पत्तियों की प्रतियां बनाएंगे। यह डिजाइन सरल होता है और आकर्षक दिखता है।
- बेल और पैशली डिजाइन: इस डिजाइन में, आप हाथ की कलाई पर एक बेल और पैशली के आकार बना सकते हैं। इसके लिए, आप सदा मेहंदी के उलट रेखाएं बनाएंगे, जिन्हें गूठर बनाने के लिए बांधेंगे। फिर उन गूठरों के आसपास पैशली के आकार बनाएंगे। इसमें आप विभिन्न समतल और गोल रंगों का उपयोग कर सकते हैं ताकि वह दिखने में आकर्षक और रंगीन हो।
- आधुनिक जाली डिजाइन: यदि आप आधुनिक और अलगावदी मेहंदी डिजाइन की तलाश में हैं, तो आप हाथ की पृष्ठभूमि पर जाली डिजाइन बना सकते हैं। इसके लिए, आपको सदा मेहंदी की एक लंबी रेखा बनानी होगी, जिसे आपको गोल गूठर बनाना होगा। फिर, आप गूठरों के बीच छोटे वृत्त डिजाइन बनाएंगे। इसे आप सिर्फ दोनों हाथों की कलाई पर या पूरे हाथ पर बना सकते हैं। यह डिजाइन आधुनिक और स्टाइलिश दिखता है।
- लीफ और जंगली फ़ील डिजाइन: इस डिजाइन में, आप हाथ की कलाई पर पौधे, पत्तियाँ और जंगली फ़ील की डिजाइन बना सकते हैं। इसके लिए, आपको सदा मेहंदी के उलट रेखाएं बनानी होगी और उन्हें गूठर बनाने के लिए बांधेंगे। फिर, उन गूठरों के आसपास पत्तियों और फ़ील की आकार बनाएंगे। इसमें आप नीले या हरे रंग की मेहंदी का उपयोग कर सकते हैं ताकि यह जंगली और प्राकृतिक दिखे।
ये कुछ सुंदर और आसान मेहंदी डिजाइन आपकी मदद कर सकते हैं। आप इन डिजाइन्स को अपनी पसंद के अनुसार विभिन्न आकार और आकृतियों में बदल सकते हैं। आपके मेहंदी डिजाइन को अद्यतित करने के लिए अपनी रचनात्मकता का उपयोग करें और खुद के व्यक्तिगत स्टाइल को शामिल करें। शुभकामनाएं!


